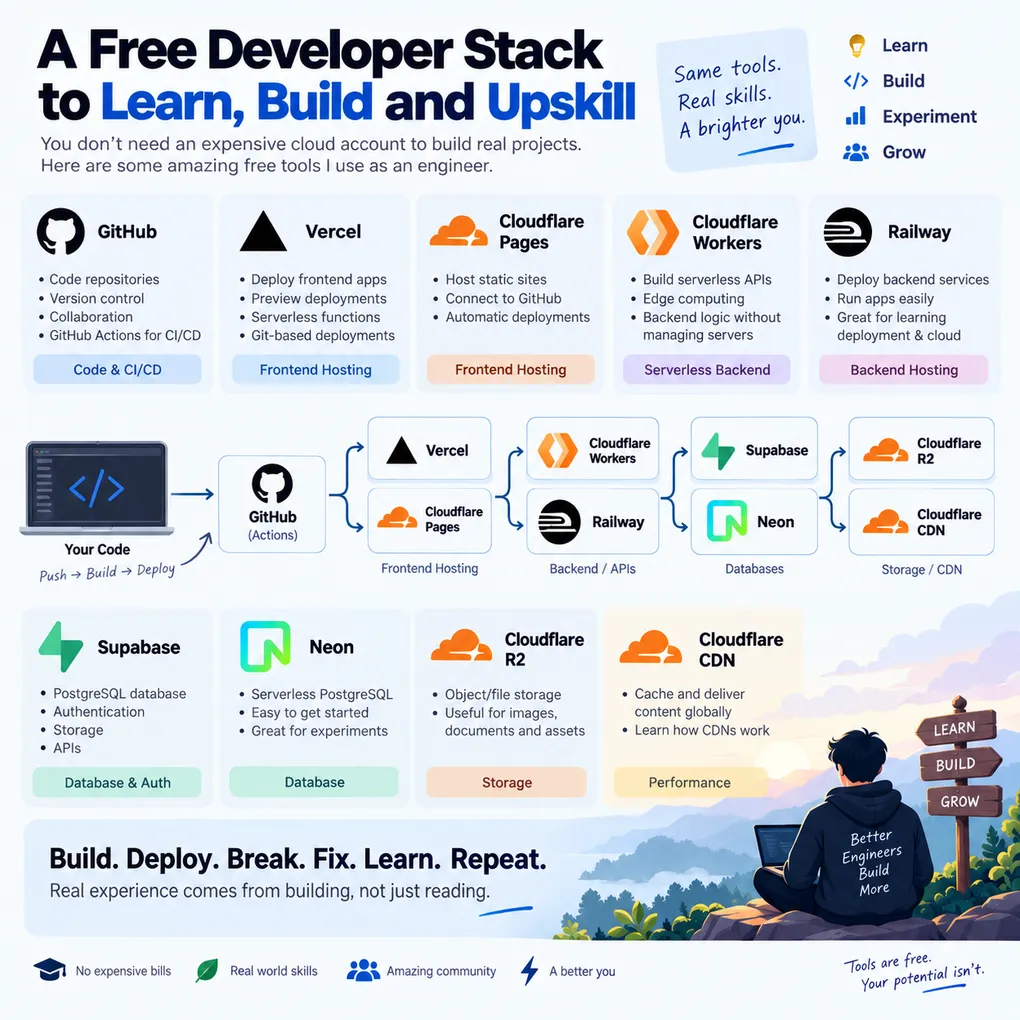
Build Real Cloud Applications Without an Expensive Cloud Account

Build Real Cloud Applications Without an Expensive Cloud Account
You don’t need an expensive cloud account to learn how to build and deploy real applications.
If you’re an engineer trying to upskill, you can build a surprisingly complete application stack using free tiers and developer-friendly tools.
You can write code, deploy frontend applications, run backend services, work with databases, add authentication, store files, configure CI/CD, and even learn how content gets delivered globally.
And you can do much of this without immediately spending hundreds of dollars on AWS, Azure, or Google Cloud.
Here is the stack I personally use.
The Free-Tier Cloud Stack
The idea isn’t to replace AWS, Azure, or GCP.
The goal is to learn the concepts and workflows that make cloud engineering valuable without letting cloud costs become a barrier to experimentation.
GitHub
GitHub is the starting point for the stack.
It handles:
- Code repositories
- Version control
- Collaboration
- Pull requests
- GitHub Actions for CI/CD
For a learning project, GitHub can become the central place where your source code lives and where your deployment pipeline begins.
Vercel
Vercel makes deploying frontend applications extremely simple.
You can use it for:
- Deploying frontend applications
- Preview deployments
- Serverless functions
- Git-based deployments
One of the biggest advantages is how easily a Git repository can be connected to a deployment pipeline.
Push code.
The deployment happens automatically.
That alone gives you practical exposure to an important cloud workflow.
Cloudflare Pages
Cloudflare Pages is another option for hosting frontend applications and static websites.
It can be used to:
- Host static sites
- Host frontend applications
- Connect directly to GitHub
- Automatically deploy changes
This gives you another practical way to understand how source code moves from a repository into a globally accessible application.
Cloudflare Workers
Cloudflare Workers can be used to build serverless backend logic.
You can use Workers for:
- Serverless APIs
- Backend logic
- Edge computing
- Request processing without managing traditional servers
This is particularly useful when you’re trying to understand the idea of running backend code without having to provision and maintain a traditional server.
Cloudflare CDN
A CDN is one of those concepts that becomes much easier to understand when you actually use one.
Cloudflare’s CDN can:
- Cache content
- Deliver content globally
- Reduce latency for users
- Help you understand how content distribution works
Instead of simply reading about CDNs, you can actually deploy something and observe what happens when content is cached and delivered from locations closer to users.
Cloudflare R2
Cloudflare R2 provides object storage for files and other assets.
It can be useful for storing:
- Images
- Documents
- Application assets
- User-uploaded files
This introduces another important cloud concept: separating application data from file/object storage.
Instead of putting everything directly into your application server or database, you can use dedicated object storage for large files.
Supabase
Supabase provides several useful building blocks for application development.
You can use it for:
- PostgreSQL databases
- Authentication
- Storage
- APIs
This makes it particularly useful for developers who want to build complete applications without having to configure every infrastructure component themselves.
You can go from an empty project to an application with a database and authentication surprisingly quickly.
Neon
Neon provides serverless PostgreSQL.
It’s another useful option when experimenting with database-backed applications.
For learning purposes, having access to a managed PostgreSQL database means you can focus on:
- Database design
- Queries
- Application integration
- Connection management
- Deployment
without spending your time setting up database infrastructure manually.
Railway
Railway can be used to deploy backend services and applications without manually configuring traditional infrastructure.
It is useful for learning concepts such as:
- Backend deployment
- Environment variables
- Application hosting
- Build and deployment workflows
- Infrastructure basics
For someone learning cloud development, the simplicity can be useful because you can spend more time building and experimenting.
Putting Everything Together
Once you combine these services, you can build a stack that looks something like this:
GitHub
   │
   ├── GitHub Actions
   │
   ▼
Vercel / Cloudflare Pages
   │
   ▼
Cloudflare Workers / Railway
   │
   ▼
Supabase / Neon
   │
   ▼
Cloudflare R2
   │
   ▼
Cloudflare CDN
The exact architecture will depend on the application you’re building.
You don’t necessarily need every service in every project.
The point is to understand what each layer does and how the pieces fit together.
Suddenly, You’re Not Just “Learning Cloud”
This is where things become interesting.
Instead of following a tutorial that says:
“This is what a database is.”
You can actually build an application that uses one.
Instead of reading about CI/CD, you can create a pipeline that automatically deploys your application.
Instead of watching a video about authentication, you can implement login and registration.
Instead of reading about object storage, you can upload files to R2.
Instead of studying CDNs theoretically, you can deploy content and see how it gets delivered.
You’re no longer just learning individual cloud services.
You’re learning how applications are actually put together.
A Simple Project You Can Build
Imagine building a small application such as a developer portfolio, blogging platform, or project management application.
You could have:
Frontend
   │
   └── Vercel / Cloudflare Pages
              │
              ▼
          Backend API
              │
       ┌──────┴──────┐
       ▼             ▼
   PostgreSQL     Object Storage
 Supabase/Neon     Cloudflare R2
Then add:
GitHub
   │
   ▼
GitHub Actions
   │
   ▼
Automated Deployment
And eventually:
Users
   │
   ▼
Cloudflare CDN
   │
   ▼
Your Application
Suddenly, a small personal project starts giving you exposure to concepts that appear in much larger production systems.
Don’t Try to Learn Everything at Once
One mistake developers make when trying to learn cloud is attempting to learn ten services simultaneously.
You don’t need to.
Start with something simple.
Step 1: Build an application
Don’t start by opening a cloud console.
Start by building something you actually want to use.
It could be:
- A portfolio
- A blog
- A task manager
- A URL shortener
- A small e-commerce application
- A developer dashboard
- An API
Step 2: Put the code on GitHub
Learn the basics of:
- Git
- Branches
- Commits
- Pull requests
- Repository management
Now your project has a proper source-control workflow.
Step 3: Deploy it
Connect your repository to Vercel, Cloudflare Pages, Railway, or another suitable platform.
Make a change.
Push it.
Watch the deployment happen.
Now you’ve experienced a basic deployment pipeline.
Step 4: Add a Database
Connect Supabase or Neon.
Start with something simple.
Create a table.
Insert some data.
Query it from your application.
Now you’re learning how an application communicates with managed database infrastructure.
Step 5: Add Authentication
Add user registration and login.
Now your application has an actual identity layer.
You can start thinking about:
- Sessions
- Access control
- Protected routes
- User-specific data
Step 6: Add File Storage
Add Cloudflare R2 for images or documents.
Now you have another important piece of a real application architecture.
Your database can store metadata while the actual files live in object storage.
Step 7: Add CI/CD
Use GitHub Actions to automate parts of your workflow.
For example:
Developer
   │
   ▼
Git Push
   │
   ▼
GitHub
   │
   ▼
GitHub Actions
   │
   ├── Build
   ├── Test
   └── Deploy
Now you’re no longer manually deploying every change.
Step 8: Break Something
This might actually be one of the most valuable steps.
Change something.
Deploy it.
See what breaks.
Read the logs.
Find the problem.
Fix it.
Deploy again.
That’s where a lot of practical knowledge comes from.
The Goal Isn’t to Collect Cloud Services
You don’t need to create accounts on every cloud platform just so you can put them on your resume.
The goal is to understand how the pieces work together.
Understand:
- How code gets deployed
- How applications communicate with databases
- How authentication works
- How APIs are exposed
- How files are stored
- How content is cached
- How CI/CD pipelines work
- How applications behave in production
Once you understand those concepts, learning a different cloud provider becomes much easier.
The service names may change.
The underlying engineering concepts often don’t.
You Don’t Need a Huge Cloud Bill
Cloud learning doesn’t have to start with an expensive account.
You can start small.
Build a project.
Deploy it.
Break it.
Fix it.
Add authentication.
Add a database.
Add CI/CD.
Add storage.
Add caching.
Monitor what happens.
Then gradually make the architecture more sophisticated.
You will learn far more from building and debugging a real application than from simply watching another cloud tutorial.
Final Thought
You don’t need a big cloud bill to build cloud experience.
You need a project, some curiosity, and the willingness to experiment.
Start with something small.
Build it.
Deploy it.
Break it.
Fix it.
Then keep adding things you want to understand.